Devices
A device is one physical unit that reports to SensoCAN. Everything it measures is a sensor on that device, and every reading, chart, alarm and export in the platform hangs off that pairing. See Sensors for the measurement side.
"Which devices are offline right now, and how long have they been offline?" — the assistant answers from your own data, in the app or in Slack. See Ask SensoCAN.
Every device has a Device Class, chosen when you create it and fixed from then on:
- Standard — the device sends its own readings.
- Gateway — the device relays readings from supported BLE beacons instead of sensing anything itself. See Gateways & Beacons.
Who sees which devices
Visibility is per user, not per role. The organisation owner sees every device in the organisation. Everyone else — including administrators — sees only the devices they have been assigned to, plus those devices' sensors and any group containing at least one of them.
Create a device and only the organisation owner will find it. Assign users from the device's Manage Assignments button, or in bulk from Assets → Device Assignments. See Users and Roles and permissions.
What you may do with a visible device is a separate question, decided by your role: viewing, editing, bulk editing, deleting, changing status and seeing credentials are all separate permissions.
The Devices list
Open Assets → Devices. The header reads "Devices — Manage your IoT devices", with Add Device on the right if your role can create devices.
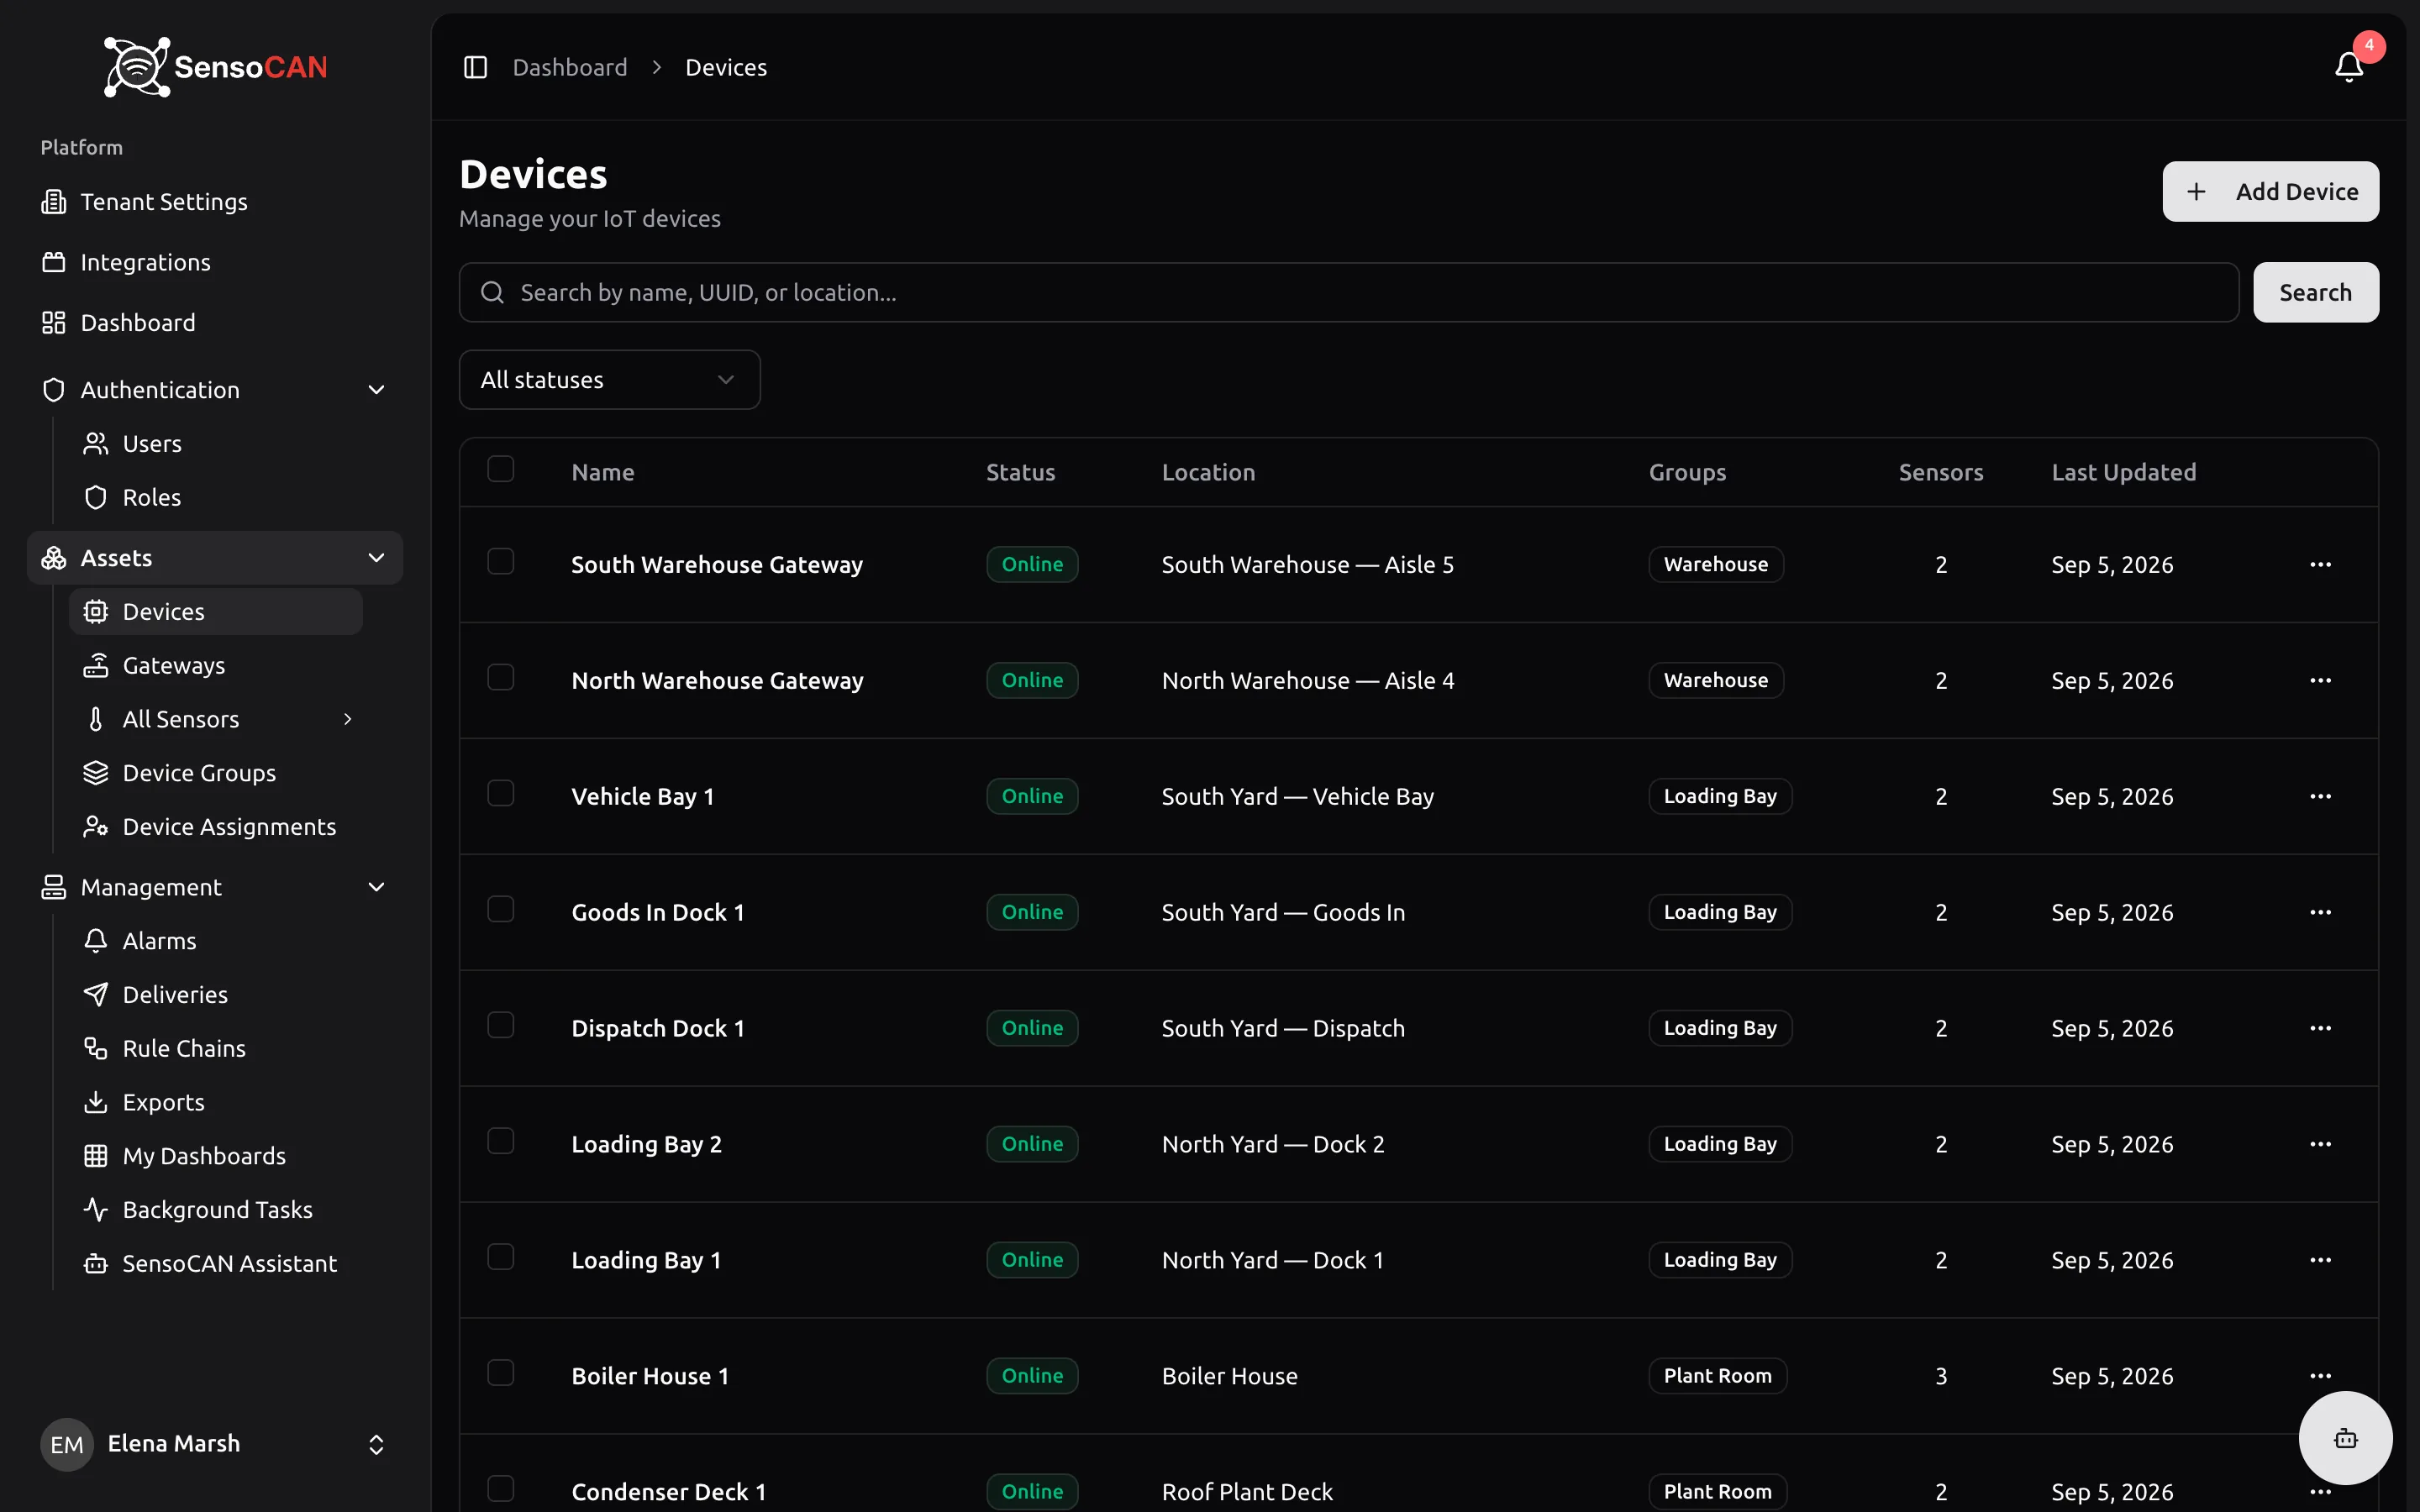
Search matches the device name, its location or its UUID, and ignores case. Type into "Search by name, UUID, or location..." and press Search. A Clear button appears whenever a search or filter is active.
Filter with the status dropdown: All statuses, Online, Offline or Error.
Columns are Name, Status, Location, Groups, Sensors and Last Updated, followed by a row actions menu. The Groups cell shows the first two groups as badges that open the group, then "+2 more" for the rest, or "None" when the device is in no group. An empty Location shows a dash.
Sorting. Devices arrive ordered by health — online first, then error, then offline, newest first inside each block. Click Name, Status or Last Updated to sort by that column instead: the first click sorts ascending, a second click on the same header flips to descending.
Per page offers 10, 25, 50 or 100 alongside the default 15, and the footer reads "Showing 1 to 15 of 42 devices".
Live updates. Status badges and Last Updated change in place as devices connect and drop. You never need to reload the list.
Bulk edit. Ticking rows reveals a bar reading "3 device(s) selected" with Bulk Edit and Clear. On the bulk form each card has its own apply checkbox and only ticked fields are written: Location, Rule Chain, Device Groups (the chosen groups replace the existing ones), Offline Cutoff Time, Power Source with battery type, and the six notification switches. Devices you are not assigned to are skipped, and the result tells you how many.
Add a device
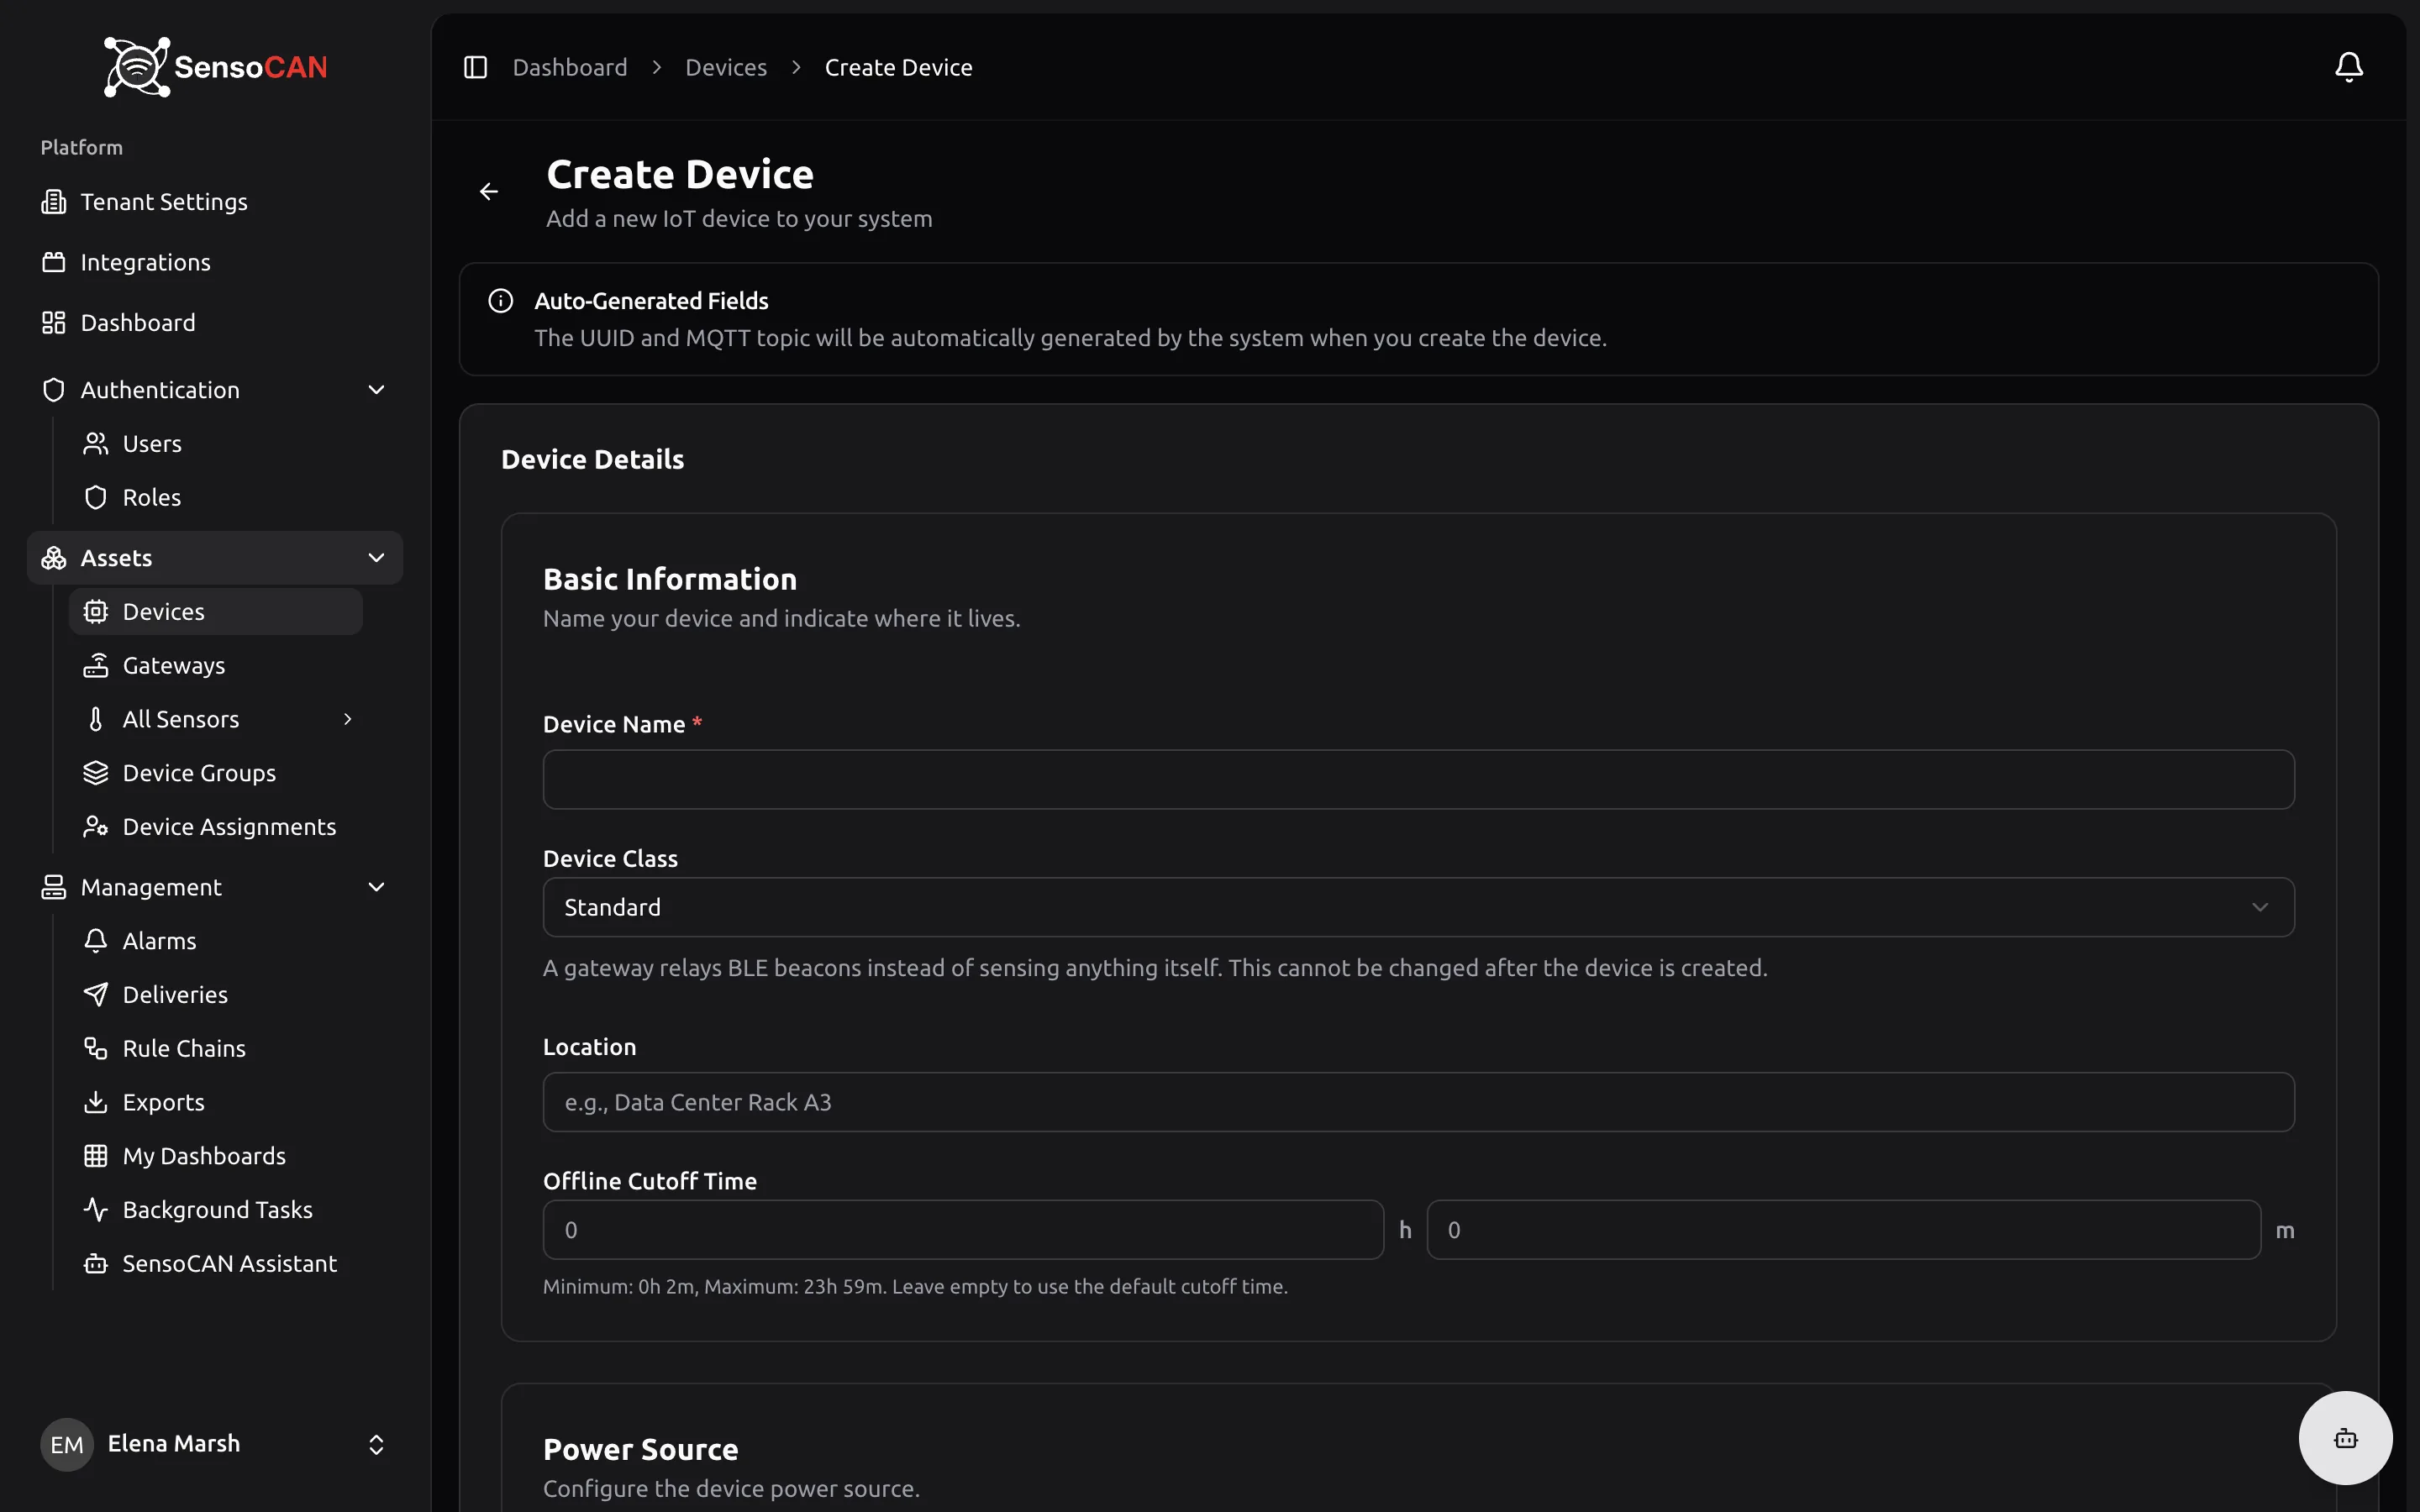
Go to Devices → Add Device. An info box explains that "The UUID and MQTT topic will be automatically generated by the system when you create the device", so there is nothing to invent yourself.
Basic Information — "Name your device and indicate where it lives."
- Device Name (required) — up to 255 characters, and only letters, numbers, spaces, underscores and hyphens. Anything else is refused with "The name may only include letters, numbers, spaces, underscores, and hyphens."
- Device Class (required) — Standard or Gateway. The help text warns that "A gateway relays BLE beacons instead of sensing anything itself. This cannot be changed after the device is created." On the edit form the class is shown as a badge you cannot change.
- MQTT Client ID — gateway class only, and only while creating. Optional. The help reads "1-64 characters: letters, digits, dash or underscore. Used as the broker client ID — leave empty to generate one automatically." The field stops you at 64 characters, and the value has to be unique across the platform: a clash returns "This device ID is already registered."
- Location — optional, up to 255 characters, placeholder "e.g., Data Center Rack A3". It is searchable, so it is worth filling in.
- Offline Cutoff Time — how long the device may stay silent before SensoCAN marks it offline. The hours-and-minutes input is labelled "Minimum: 0h 2m, Maximum: 23h 59m. Leave empty to use the default cutoff time."
Power Source — "Configure the device power source." Choose Direct Power or Battery. Battery reveals Battery Type, which is then required and lists each supported chemistry with its maximum voltage. The list is maintained for you; you cannot add your own.
Notification Recipients — "Add contacts who should get alerts from this device."
- Email Recipients — an address plus a label: Default, Severity L1, Severity L2 or Severity L3. Press Add for each one.
- SMS Recipients — an international phone number with its country code, the same labels, and per-recipient SMS and WA channel switches. New recipients start with both on and at least one must stay on. A malformed number is refused with "The phone number must be a valid international phone number with country code (e.g., +1234567890)."
Notification Settings — "Control which notification types this device can receive." The create form carries Email, SMS, WhatsApp, Status Change and Offline Alarm. Set Push and WhatsApp on the Edit page after creation; on the create form the WhatsApp switch cannot be turned off, and new devices are created with WhatsApp enabled.
Finish with Cancel or Create Device (which reads "Saving..." while it works). Anything the server rejects is listed above the form under "Please fix the following errors:". Success flashes "Device created successfully" and returns you to the list.
Device Details
Click a device name to open its page. A Live badge and a connection indicator appear while real-time updates are flowing; status, last-seen, battery and sensor values then refresh on their own.
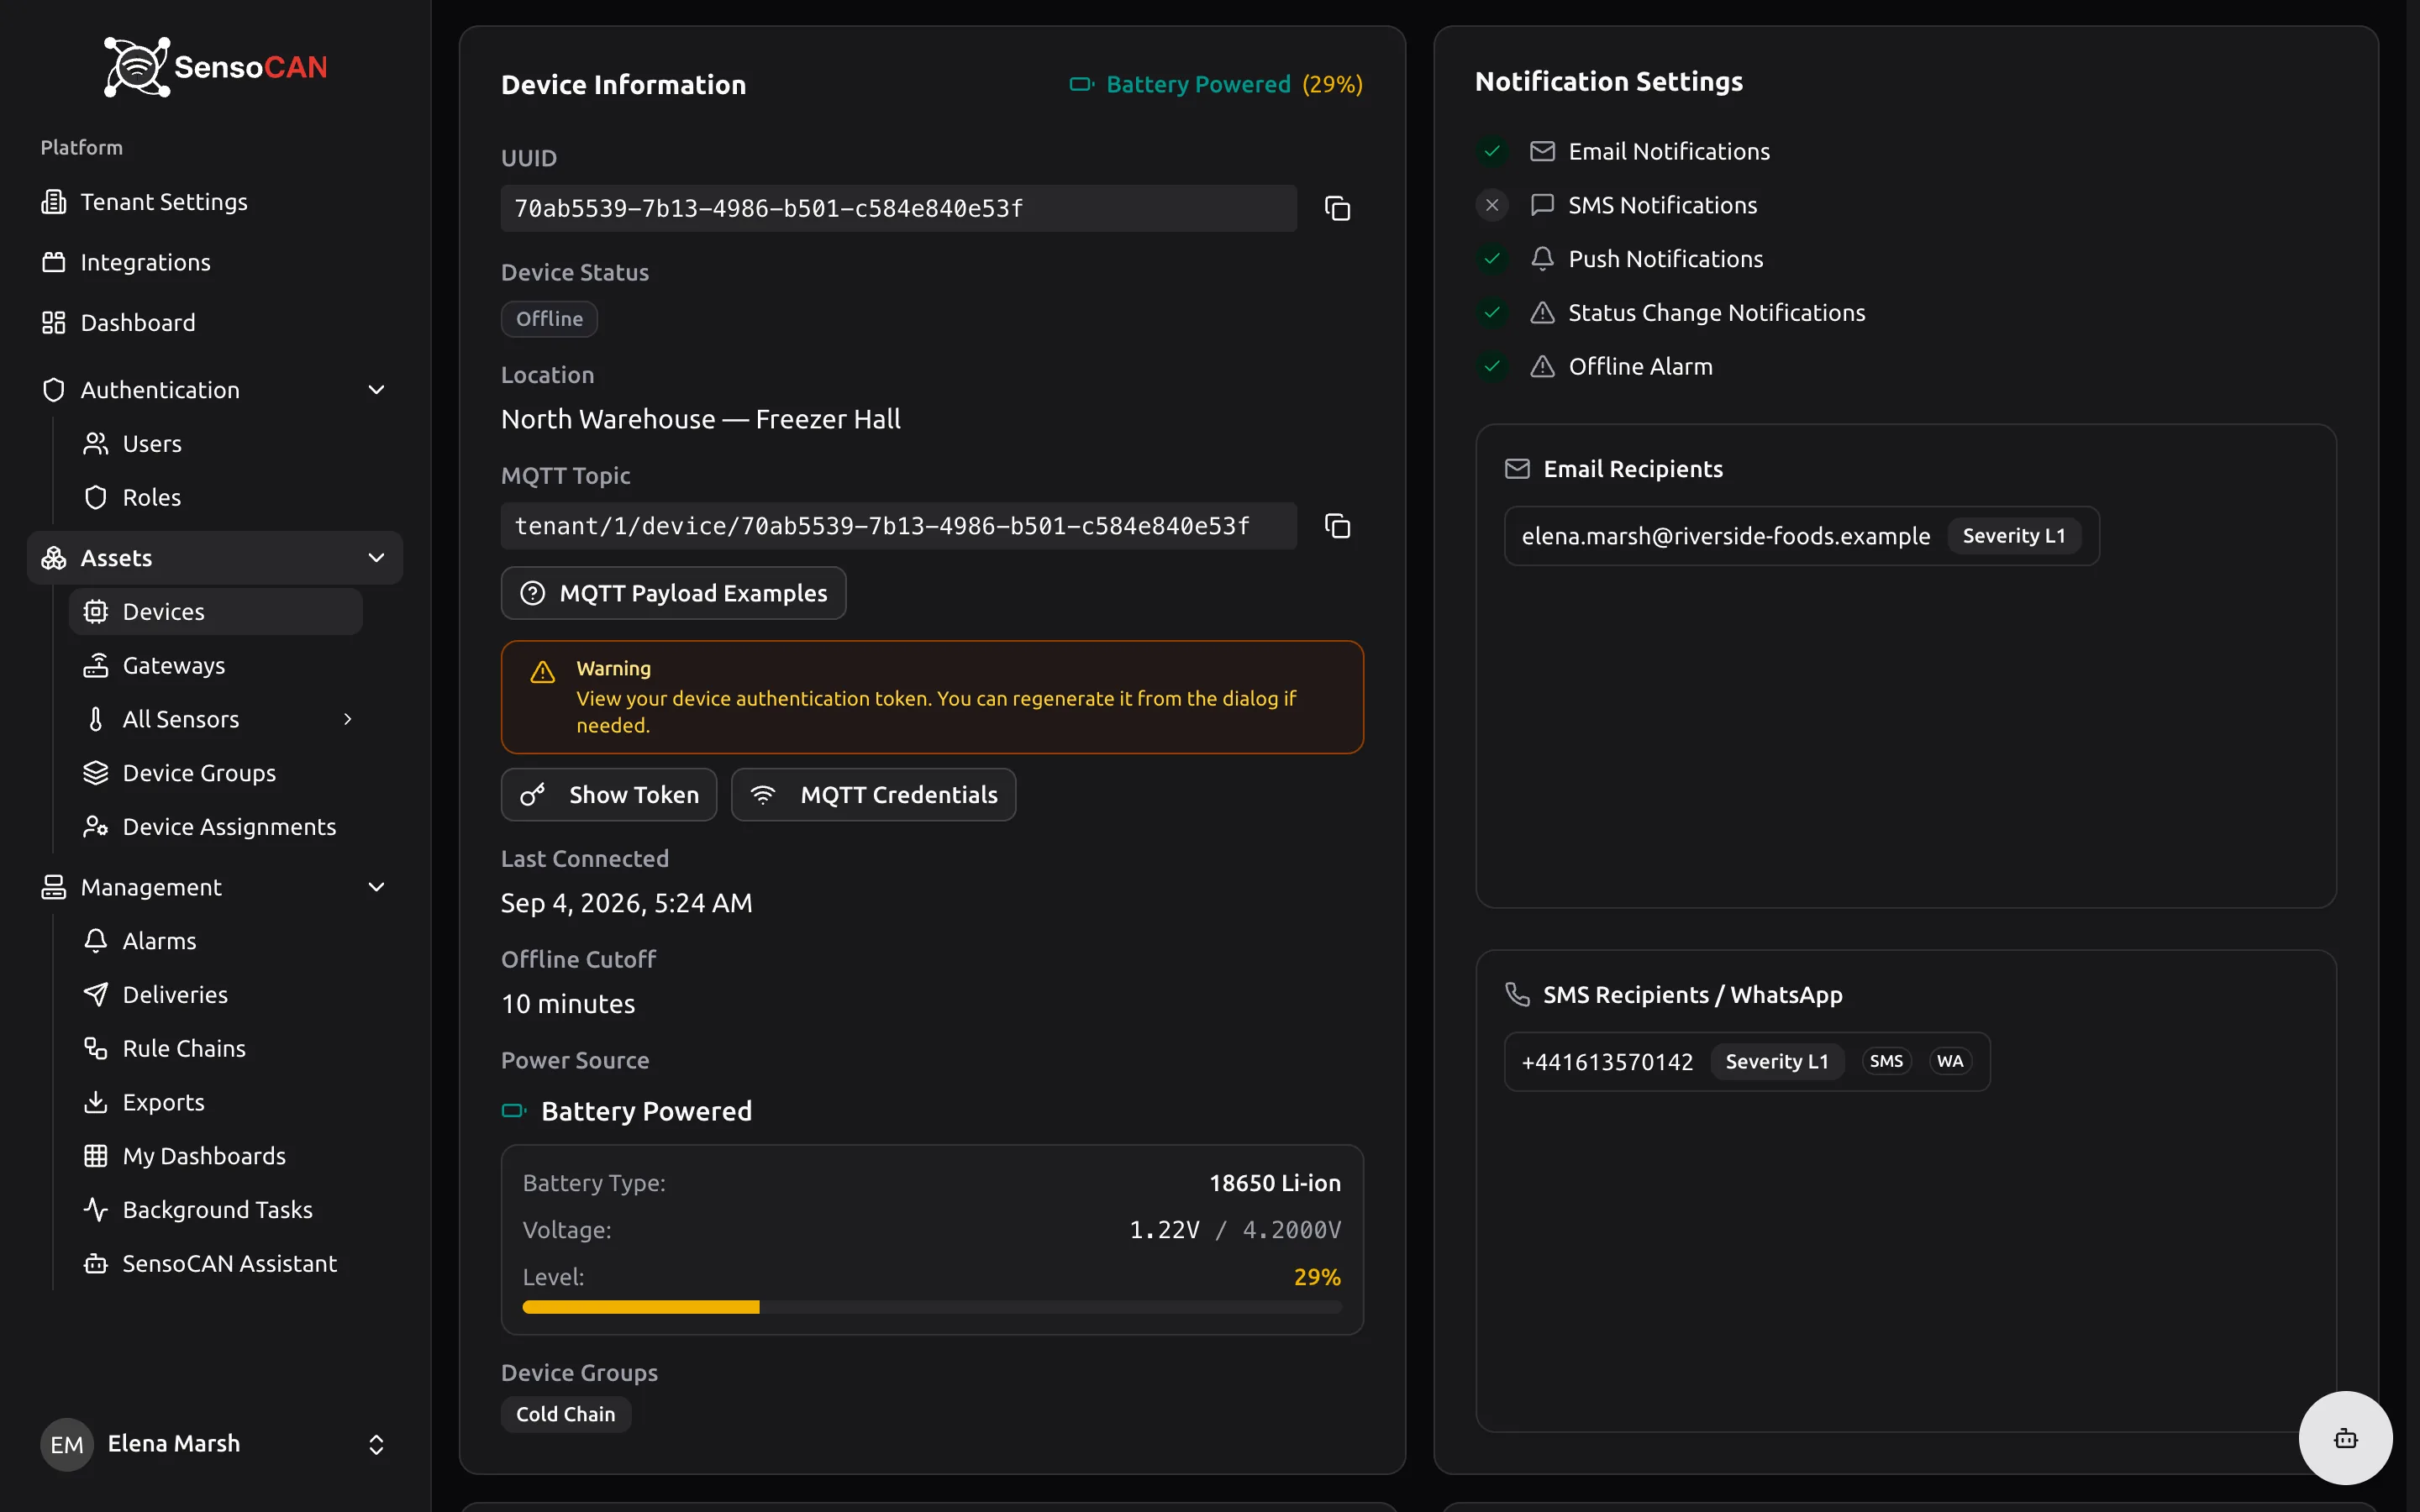
Device Information carries a power badge in its header — "Battery Powered (72%)" or "Direct Power" — and these rows:
- UUID, with a copy button that confirms "UUID copied to clipboard". This is the device's permanent identifier.
- Device Status, live.
- Location, when one is set.
- MQTT Topic, with a copy button, and an MQTT Payload Examples dialog beside it. Its tabs cover a single reading, several readings for one sensor, several sensors at once and battery-only messages, each printing the exact topic and payload for this device. Before the device has sensors it notes "No sensors configured yet. Examples show placeholder sensor names."
- An amber panel — "Warning — View your device authentication token. You can regenerate it from the dialog if needed." — holding Show Token and MQTT Credentials, shown only to roles allowed to see them. Show Token opens "Device Authentication Token", with the token, a copy button, a Regenerate button and the caution "Store this token in a secure location. Regenerating will invalidate the current token." MQTT Credentials opens the username and password with copy buttons and Copy Both. Credentials are generated the first time you open the dialog, and the same password is shown on later visits. For a gateway the dialog adds the commissioning values. What to do with all of this is covered in Device Connectivity, MQTT and the HTTP API.
- Last Connected, or "Never connected".
- Offline Cutoff, in minutes, marked as the default when the device has no cutoff of its own.
- Power Source. Battery devices get a panel with Battery Type, Voltage against the type's maximum, and a Level percentage with a bar — green from 40% up, amber from 20 to 39%, red below 20% — or "No battery readings received yet" until the device reports a voltage.
- Device Groups, as badges.
Notification Settings repeats the switches as tick-or-cross rows, then lists Email Recipients and SMS Recipients with their labels and channel badges, or "No email recipients configured" and "No SMS recipients configured".
Rule Chain Assignments shows what will process this device's data, with the chains assigned to it and an Assign Rule Chain picker. If nothing is assigned, the card says the organisation's default chain will be applied automatically. Read the two red warnings carefully: they tell you that the default chain is inactive, or that no chain applies at all, and in both cases the device's data is not being stored. See Rule chains.
Assigned Users lists the first two assigned users with Unassign, and a Manage Assignments or View Assignments button for the full list.
Sensors shows the first five sensors as a table of Name, Type, Current Value with its unit, Last Updated and Created, with View all beyond that and Add Sensor in the header. A live badge marks a value that has just arrived. Empty devices read "No sensors found — Add sensors to start monitoring data".
Gateways also get Diagnostics and Commands buttons in the page header and a beacon panel lower down — all covered in Gateways & Beacons.
Edit a device
Edit Device on the device page opens the same form with the class locked, plus two side cards.
Notification Settings here has all six switches:
| Switch | What it does |
|---|---|
| Email Notifications | Allow this device to send email notifications |
| SMS Notifications | Allow this device to send SMS notifications |
| Push Notifications | Allow this device to send push notifications to mobile devices |
| WhatsApp Notifications | Allow this device to send WhatsApp notifications |
| Status Change Notifications | Receive notifications when this device comes online or goes offline (Email or SMS notifications must be enabled) |
| Offline Alarm | Track this device going offline as an alarm someone has to acknowledge. Separate from Status Change Notifications, which only decides who gets messaged. |
The last two are the pair people confuse. Status Change Notifications decides whether your recipients are messaged when the device flips between online and offline. Offline Alarm decides whether going offline also raises an alarm that somebody has to acknowledge in Alarms. They are independent, and a gateway starts with Offline Alarm on.
Offline Cutoff Time is the same duration input as on the create form, still labelled "Minimum: 0h 2m, Maximum: 23h 59m. Leave empty to use the default cutoff time."
Saving flashes "Device updated successfully" and returns you to the device page.
Device status
| Status | Meaning |
|---|---|
| Online (green) | A message from the device has been processed. Any message sets the device online and refreshes Last Connected. |
| Offline (grey) | The device has been silent for longer than its Offline Cutoff. Devices that have never connected are offline too. |
| Error (red) | Reserved. Nothing in the platform sets it for you, and the interface offers no way to choose it. |
The silence check runs on a short cycle rather than continuously, so a device can be reported offline up to two minutes after its cutoff elapses.
The row actions menu also offers Set Online and Set Offline to roles that can change status — useful while commissioning. A manual status is only a stand-in: the next message from the device, or the next silence check, overrides it.
Delete a device
Delete in the actions menu opens Delete Device?, which names the device and warns that deleting it cannot be undone.
There is no trash and no restore. The device, all of its sensors and all of their readings go, group memberships and user assignments are dropped, and any open alarms for it are closed. Export anything you need first — see Exports.
To clear history from one sensor while keeping the sensor itself, use Delete Data on the sensor page instead — see Sensors.